





World map and views
The Orbital Atlas world map: pan, orbit and zoom, the View button and automatic cuts for caves, canopies and buildings, the Nether and other dimensions.
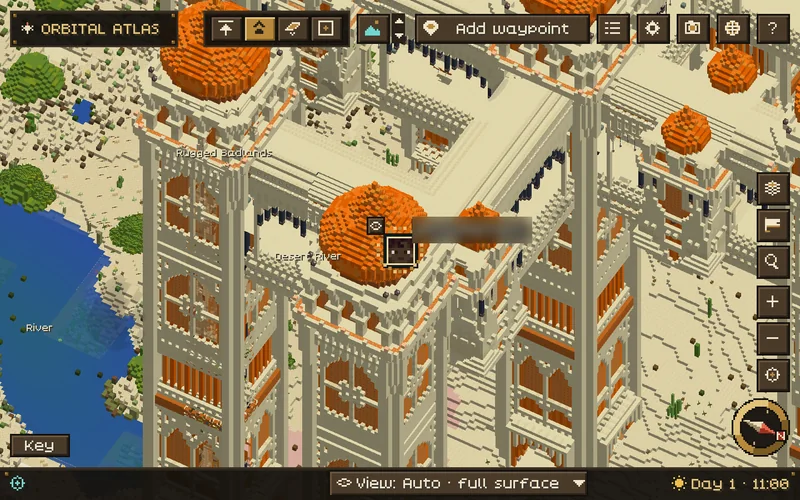
Tap M to open the world map. It opens at the minimap's view, centred on you, and the game keeps running while it is open. Press M or Esc to close it.
Moving around#
| Input | Action |
|---|---|
| Left drag | Pan. The map stops following you. |
| Right drag | Orbit and tilt. The view switches to Free. |
| Scroll | Zoom, from 32 to 65,536 blocks across. |
| Middle-click terrain | Add a waypoint there. |
| Middle-click a waypoint | Edit it. |
| Right-click | The menu for the terrain, waypoint, region label, mark or creature under the pointer. |
| Recenter | Go back to your position and follow you again. |
| Click the compass rose | Back to North up. |
| T | Open the settings drawer. |
| L | Open the Overlays menu. |
| / | Open the waypoint list with its search field. |
| H or ? | Show or hide the map controls. |
| Esc or M | Close the map. Esc first closes an open menu or tool. |
Without a middle mouse button, choose Add waypoint and then left-click explored terrain. Esc, a right-click or Cancel waypoint cancels it.
The status bar at the bottom shows the biome and the coordinates under the pointer. Explored · terrain not loaded yet means you have been there but its terrain is still loading; Uncharted means you have not explored it yet.
The toolbar#
The top bar has the view switch (North up, Player up, Free and Overhead), the interior view button with its up and down arrows, Add waypoint, Waypoints, Settings, Export map image, Dimensions (when this world has saved maps of more than one dimension) and Help. Buttons on the right edge open Overlays, Journeys and Seek, zoom in and out, and recenter the map. Levels appears when recorded floors are available, and Claims when a supported claim mod is installed (see Integrations and claims). On a narrow window the toolbar keeps only its icons.
Overhead is a steep north-up view; leaving it restores the tilt you had. Up close and at middle zoom the map is drawn in your resource pack's block textures; farther out it uses simpler saved map data, so zooming out shows less detail.
Overlays#
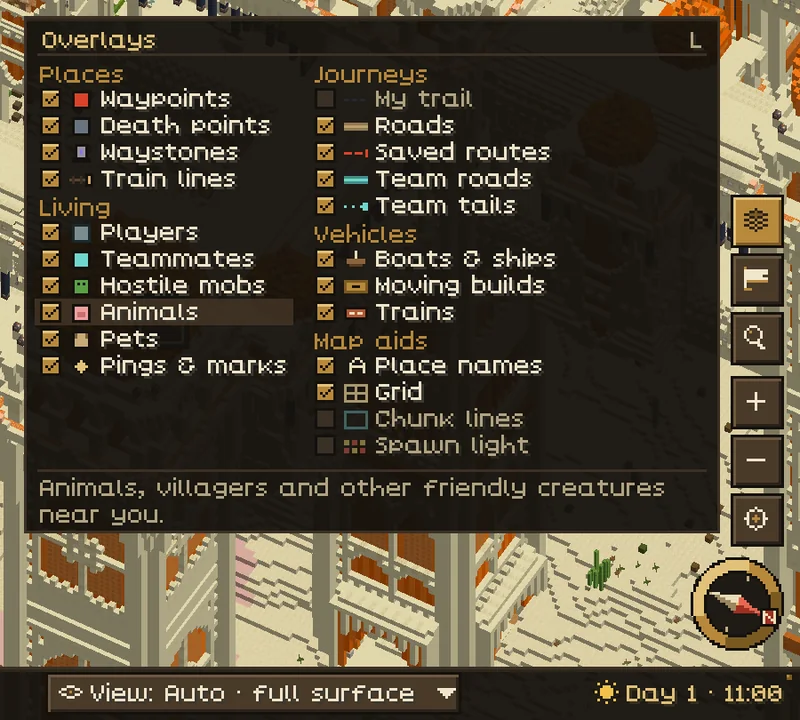
Press L or choose Overlays to pick what the map draws, in one checklist: places (waypoints, death points, waystones, claims, Create train lines), living things (players, teammates, hostile mobs, animals, pets, pings and marks), journeys (your trail, roads, saved routes, team roads, team tails), vehicles (boats and ships, moving builds, Create trains) and map aids (place names, grid, chunk lines, spawn light). Your choices are saved, and most rows are also in Settings. A row the server's rules turn off says so.
Automatic cuts#
With Interior view on Automatic (the default), both maps cut away whatever hides you:
- Underground, the rock above you is cut away so you see the cave or tunnel you are in.
- Under trees, the canopy opens along the real outline of the leaves.
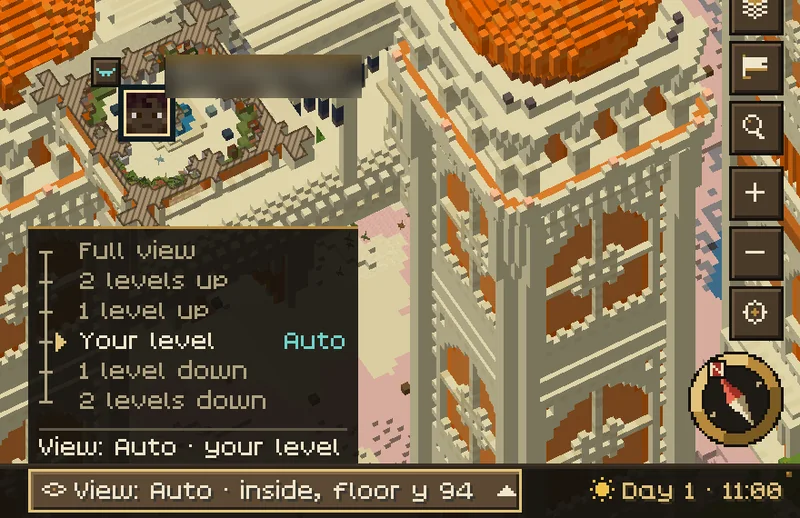
- Inside a building, the map shows the floor you stand on, like a floor plan. Walls cut by the view are drawn as hatched wall tops.
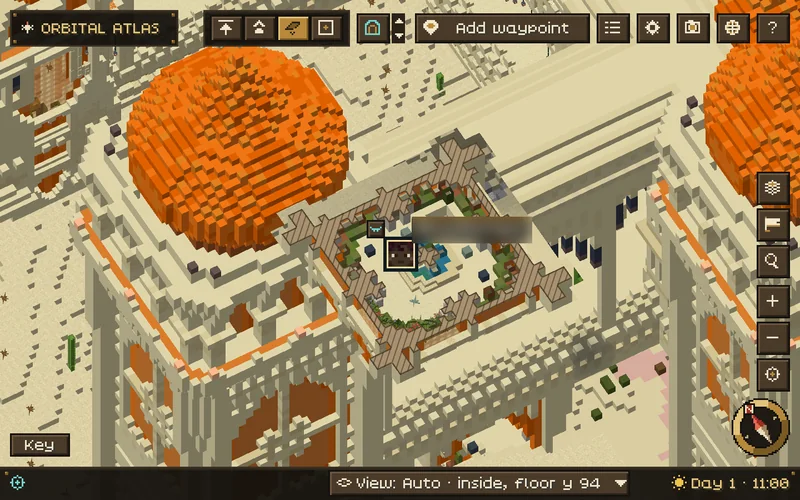
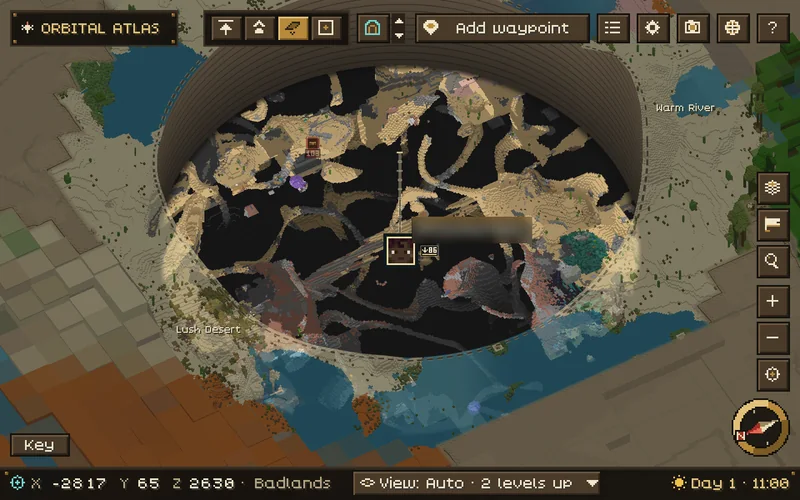
On the world map, the cave view shows through a window around you: close in it fills the view, and as you zoom out the surface comes back around a smaller window over your position. Climbing stairs or a ladder to another storey changes the level shown; a short jump does not. Long falls and flights are followed.
When you are hidden by cover and the map is not cut, an eye button appears next to your marker on the world map when you are zoomed in. Click it to cut the view to show you; the cut ends when you come out into the open, or when you tap O.
The View button and view levels#
The View button in the status bar says what the map shows now, for example View: Auto · your level. Click it to open the list of levels and pick one, or hold O and scroll to step through them. In a small map window (narrower than 480 units at your GUI scale, for example a small window at GUI scale 4), the map uses a compact layout: the View button and the clock move from the status bar into the top toolbar.
| Level | What it shows |
|---|---|
| Full view | The surface, with nothing cut away. |
| 2 levels up, 1 level up | The cut raised above you, so more of what is above shows. |
| Your level | The level you are on. |
| 1 level down, 2 levels down | The levels under you. |
A level is one storey of a building, or a band of a few blocks in caves and open ground. Levels follow you: "1 level up" stays one above you when you climb a storey. Atlas remembers a level you choose for that place (set for this place). Tap O to go back to Auto. The two keys Interior view: one level up and one level down have no default key; bind them in Controls if you prefer single keys.
Interior view modes#
Interior view (Caves & rooms in the settings drawer) has three modes. A tap of O, in play or on the world map, steps through them when you have not chosen a level:
| Mode | Behaviour |
|---|---|
| Automatic | Cuts into the cave, canopy or room you are in. The default. |
| Surface | Always shows the surface. |
| Manual | Shows the floor set by Manual floor and Level height. |
View levels are available in Automatic. In the settings drawer, Cut away the roof, Interior walls (Short wall stubs or Full room height) and Cave view walls change how cut views are drawn. Cave view sets how rock looks in the cave view:
| Style | Appearance |
|---|---|
| Floors | The default. Floors below you are shaded darker with depth, and rock reads as dark and quiet. |
| Rock | Cut rock is covered in a quiet warm grey; caves show as openings. |
| Chart | Cut rock is drawn in hatched sepia chart ink. |
No x-ray. With Show all underground off (the default), ores below the surface are drawn as the rock around them, and the cave view shows only the caves you have explored. Turning it on shows every underground block and cave as it is, where the server's rules allow it.
Levels and building storeys#
Open Levels to choose Automatic, Surface or a floor the map has recorded nearby, for example to look at a building's upper storey from outside. Manual floor and Level height in Settings set the floor's Y level and how many blocks above it show.
No recorded interior coverage at this level here means the chosen floor has nothing recorded at this spot. Go back to the building, choose another floor, or return to Automatic.
The Nether and other dimensions with a roof#
In the Nether and other dimensions with a ceiling, both maps show the layer you are in instead of the roof: the floor you walk on, lava seas and the drops around you. In the open, Automatic shows the full height; in tunnels and buildings it shows the cut layer. Here the O key steps Auto, Full height, Layer and Floor.
If a server turns cave maps off, these dimensions show Cave mapping is disabled by this server, because the only other picture would be the roof. See fair-play rules.
Dimensions#
Dimensions appears when this world has saved maps of more than one dimension. Pick one to look at its saved map, read only: a flat, coarser picture with that dimension's waypoints. Players and the radar are not shown there. Back to returns you to the live map. A saved Nether map has Layer up and Layer down, and between the Overworld and the Nether You (8:1) marks where you are on the other map. Waypoint coordinates are not converted.
Every dimension is mapped, including the End and dimensions added by mods. Ground the map has seen to be empty, such as the void between End islands, counts as explored.
The explorer's chart and region names#
Unexplored ground is drawn as an illustrated parchment chart, with its own look in each dimension. Its relief and drawings are decoration and do not reveal the real land. Newly mapped land rises in as your game loads it (turn off Animated frontier to make it appear at once).
Region labels name biomes and, with Region names: Biomes + named places (the default), a few notable places such as a large lake, a mountain range or a long valley. Everyone on the same world sees the same generated names. Hover the map for the biome name, and right-click a label to give the region your own name; clear the name and save to go back to the generated one. Label style chooses how names look: Classic, Chart (biomes lettered onto the land, named places on plaques), Plaques or Ink. Labels are hidden while the map shows a cut view.
Exporting an image#
Export map image in the toolbar, or World map > Export map image in Settings, saves the current view as a PNG of up to 2048 px in screenshots/atlas/. When it is ready you can open the image or its folder from the message.
See Troubleshooting if terrain stays incomplete.